|
|
Laying Out Frames: An Example |
Fig. 3 shows the frame layout we will use in this example.
|
upper frame (X) | |
|
lower left frame (Y) |
lower right frame (Z) |
As the figure indicates, we will use frames to divide the browser window to upper and lower halves, and then we will further divide the lower half into lower-left and lower-right quarters. The file a.html contains the HTML code necessary to accomplish the first division. It is shown in Fig. 4.
As you can see, this is a new kind of HTML. If you are an experienced HTML programmer, several things about this code should immediately stand out:
<body> tags that usually appear in HTML documents have been replaced with <frameset> tags. These tags identify a.html as a frameset document.
<frameset> TagAs we have noted already, <frameset> tags replace <body> tags in frameset documents. These frameset tags tell the browser how many row frames or column frames it should divide the browser window into. The opening <frameset> tag must include either a row list or column list declaration, but not both. Thus, the opening frameset tag should have the form
for row list declarations, and the form<frameset rows="size1,size2,...,sizen">
for column list declarations, where n is the number of rows or columns. (n should be greater than one, since it makes little sense to divide the browser window into just one frame.) Each size parameter tells the browser how large each frame should be. In a.html, we have used the special symbol "<frameset cols="size1,size2,...,sizen">,
*" (the asterisk) to tell the browser that it should determine the frame size for us. More information on how to declare the frame size will be given later.
Note that each member in a frameset row or column list represents only a declaration of a frame's existence. Frame definitions, which specify the actual content of frames declared in the <frameset> tag, are indicated within the <frame> tag.
<frame> TagLook again at the source code for a.html. Notice that there is one <frame> tag for each frame declared in the <frameset> tag. This is the way it should be, because after declaring a frame with the <frameset> tag, it is necessary also to define it using the <frame> tag.
In other words, now that we have used the <frameset> tag to divide the browser window into two row frames, we must now instruct the browser what to put in these frames. We do this with <frame> tags, placed between the <frameset> and </frameset>. In the code of a.html, the two <frame> tags define the characteristics of the two row frames declared in the <frameset> tag. (Warning! Reread this paragraph until you understand!)
Unless you find an empty frame extremely interesting, each frame definition should contain the URL of a document to be displayed within it. Frame URLs are specified within the <frame> tag by adding the tag property src="URL", where URL is the address of the document to be displayed. When a user loads a frameset document, his browser window will first be divided into frames, and then the documents specified in the <frame> tags will be loaded and displayed inside the frames.
In the frameset document, you can (and should) give each frame a name by including, within the <frame> tag, the property name="frame_name". Look again at the source code for a.html and see how this was done. In this example, the upper frame was given no name, but the lower frame was named "bottom". Giving names to frames makes it possible to target them for update when hyperlinks in other frames are selected. (More on this in lesson 2.)
To create the frame layout shown in Fig. 3, we must use a nested frameset declaration. A frameset is "nested" if it is used in place of a frame declaration in an outer frameset. The frame divided by the nested frameset is called the parent frame. (Remember this important definition.) Since our goal in this example is to divide the lower frame into lower-left and lower-right frames, we must use a nested frameset.
There are two kinds of nested framesets: directly nested framesets and indirectly nested framesets.
Rather than defining the lower frame with a <frame> tag, as we did in a.html, it is also acceptable to replace any frame definitions with additional, nested frameset declarations. For example, the <frameset> code in Fig. 5a is sufficient to accomplish our goal of dividing the browser window into three frames and simultaneously displaying body documents x.html, y.html, and z.html, one in each frame, as illustrated in Fig. 5b.
|
|
|
|||||
| a | b | |||||
<frameset> tags.
The result of this code, when viewed with a frames-capable browser, is the same as seen previously in Fig. 2, so we have already accomplished our goal in part by using directly nested frames. Theoretically, there is no limit to how deeply <frameset> tags can be nested. But remember, a browser window can be divided only so many times until the frames are too small to be useful.
The disadvantage of directly nested frames is that it makes it difficult to assign names to collections of frames, such as the row containing both y.html and z.html in Fig. 5b. This is because names are assigned in <frame> tags, not <frameset> tags (blame Netscape). To get around this limitation, we will use indirect frameset nesting by setting the URL of the lower frame to the address of another frameset document, yz.html! (Tricky, don't you think?)
The code for yz.html is given in Fig. 6.
|
|
If you've understood everything up to this point, then you should have no problem seeing that yz.html has the exact same structure as a.html, except that it specifies a frame layout where the window is divided into two columns, rather than rows. We've seen, already, in Fig. 1 what the contents documents y.html and z.html look like when viewed separately. The code in yz.html allows us to view both of these documents side by side, in a column-frame separated window, as illustrated in Fig. 7.
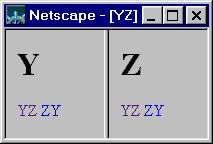
Fig. 7 -- File yz.html as it appears on a frames-capable browser.
However, what happens if we view yz.html not as an independent document, but rather as one of the documents to be displayed in the lower frame of a.html? The answer is simple: Rather than dividing the entire browser window into left and right frames, the code of yz.html will instead divide just the lower frame of a.html -- into lower-left and lower-right frames, as shown in Fig. 8.
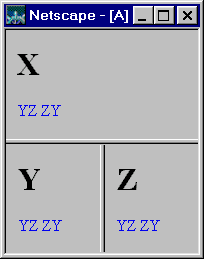
Fig. 8 -- Document a.html as viewed on a frames-capable browser.
Pretty cool, don't you think? I knew you'd like it. The logical structure of this nested frame set is illustrated in Fig. 9.
a.html (splits browser into upper and lower frames)
|
| frameset document | |
| body document |
If you've understood everything up to this point, you are now ready to learn frame targeting, the subject of our next lesson. However, if things are still a bit cloudy, then you really should read this lesson one more time, carefully, because it is the foundation of everything to come. In particular, be sure to review the figures and sample code, and understand how they relate. If you don't, you will be completely lost in Lesson 2!
-- End of Lesson 1 --
[ menu | previous page ]